
As with all good mathematics, I just spent hours pondering how to set up my super cool Cuisenaire Rod quadtuple.
It was a great experience. Made me wonder why I was being so selfish in keeping it to myself.
This is a perfect thing for kids to do!
The Setup
Seems simple enough. Make a picture on 1cm square graph paper with Cuisenaire Rods. Then write down the coordinates of the rods. Voila! You have the coordinate representation of your picture. Furthermore, you’ve practiced coordinates!
Cool, right?
The rub is that you have to correctly identify the orientation of the rods – are they up-and-down or side-to-side? Or worse – at an angle!
So now we have four things to identify: size/color, angle of rotation, x coordinate, and y coordinate.
Since the rods have width, we can’t just say “put it at (3,2).” What part of the rod goes at (3,2)? One of the four corners? The midpoint of one of the sides?
I just picked one.
My official Cuisenaire Rod Ordered Quadtuple (CROQ) looks like this:
(size of rod, angle of rod, x-value of anchor, y-value of anchor)
The size of the rod is easy.
The angle of the rod is clear, but we have to define what is zero (up-and-down or side-to-side) and how we rotate (always clockwise, counter-clockwise, either way, etc.).
I picked up-and-down to be zero degrees. It is the way I naturally look at the rods. Like this:
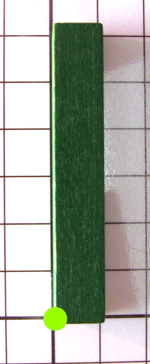
See the bright green dot? That’s the anchor point. It stays there (in your mind) and is the bit that you’ll put on the (x, y) point.
Which means that as you change the orientation (or rotate your rod), it sticks around. Like this:

This rod is (5, 90, 0, 0) because it is 5cm long, rotated 90 degrees (clockwise) and the anchor is at (0, 0).
You can do interesting angles too!
Check out the 45 degree one:
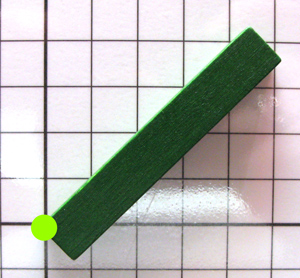
This one has the 4-tuple (6, 45, 0, 0). Notice that the rotation is always clockwise.
This works, but isn’t the best way.
When we graph (typically), zero degrees is horizontal. And sticking out to the right of the origin.
Perhaps the best way to represent the rods on the plane is to use this type of set up. But it wasn’t the natural choice for me.
Which is right?
It doesn’t really matter. Unless you’re running a contest (which I think ETA Cuisenaire is putting together).
Try this at home. It simulates what researching mathematicians do everyday:
- Let your child make a piece of artwork with the rods on graph paper. Go ahead and spring for another home set of rods and let him glue it. You can frame it and put it on the wall later.
- Ask him to do this: “Using only numbers, letters and punctuation, write the instructions to recreate your picture.”
- Take a piece of graph paper and recreate their picture yourself, based on what he’s written.
- Compare yours and his. Are they the same? If not, what happened? If so, were there any challenges for you while redoing it?
- Discuss it and let him think about this as long as he wants (minutes, days, weeks, years). Then ask him if he can think of a different way to describe it so it is easier to recreate.
- Repeat as many times as is enjoyable. After a while – sometimes years – he’ll create something similar (probably better) than what I have above.
But, really, which is right?
This is exactly what mathematics is all about. Not which is right, but which feels best. And which one will we agree on.
When ETA Cuisenaire puts together their contest, they’ll have the rules clearly defined. “Right” will only be according to how they set it up. When you enter, they’ll recreate your art based on their rules.
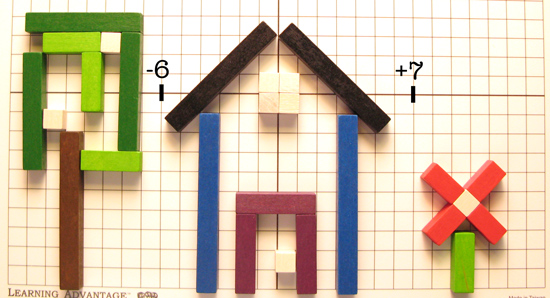
I like my rules. So much so, I’m going to use them next week to give the coordinates for the image at the top of this article. Wanna compare? Do it and post your CROQs in the comments.
(Notice there’s a whole-lotta math goin’ on in that image – not just coordinates!)

Leave a Reply