Category: Geometry

  • Egg Hunt Shows Natural Math Ability

    Egg Hunt Shows Natural Math Ability

    I saw natural math ability yesterday!

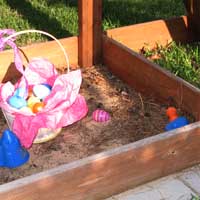
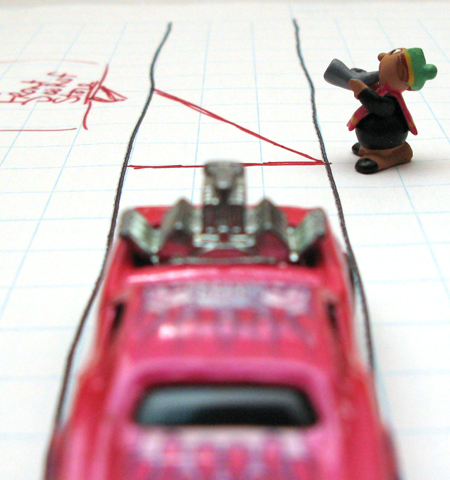
    K8 was hunting Easter eggs at Mawmaw & Pawpaw’s house. She saw an egg inside the sandbox. As she reached into the box she realized the egg was too far away.

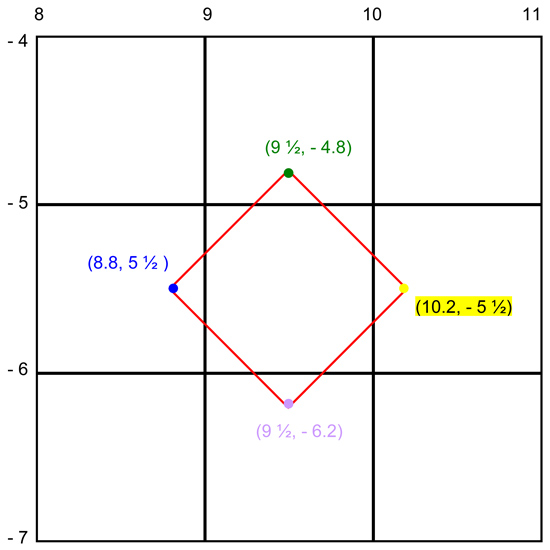
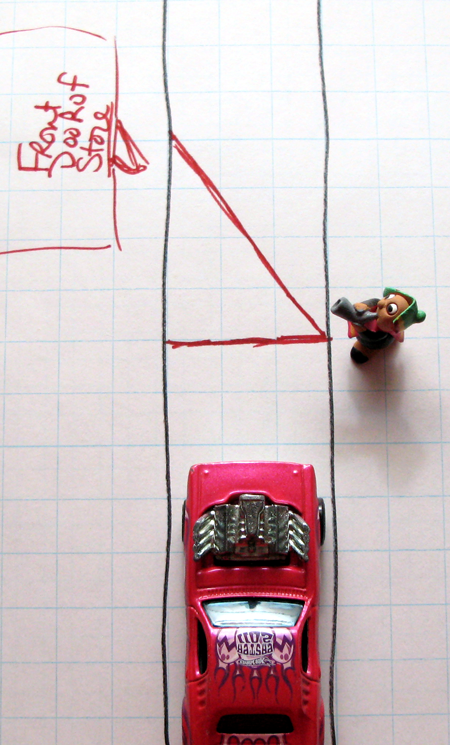
    She was standing where the footprints are. The egg was where the striped egg is:

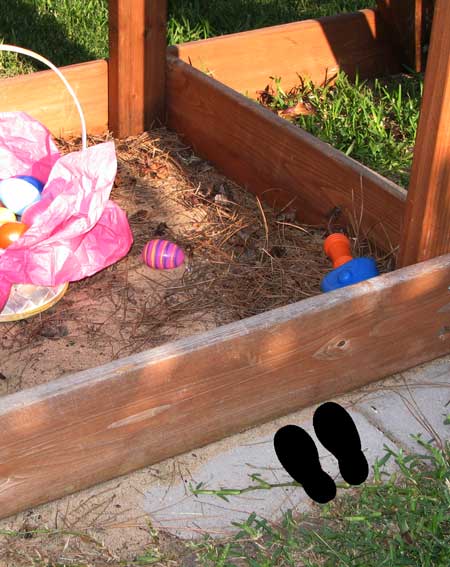
    She needed to step inside the sandbox.

    The “easy” answer was to step inside the sandbox. But she wanted no part of the gritty sand.

    With no hesitation, she moved from her location, around the sandbox to the new spot:

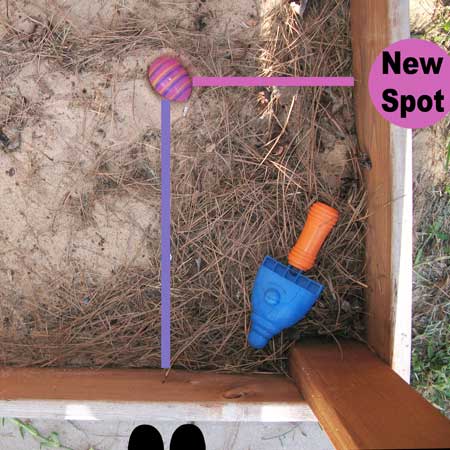
    This took some effort because she had to squat to get under the ladder. But she had seen that avoiding the sand was possible if she accessed the egg from the other side.

    She recognized and compared distances!

    With no vocabulary or formal training (indeed she’s 2 1/2 years old) she identified perpendicular distance! She assessed which side of the square sandbox would minimize this distance. And she acted on that assessment.

    It’s normal for parents to believe their children are especially smart, gifted or brilliant. I believe that all children are these things.

    Kids have a natural math ability. And so do you.

    What do you think? Share your thoughts in the comments and make sure to share this story with your twitter network!
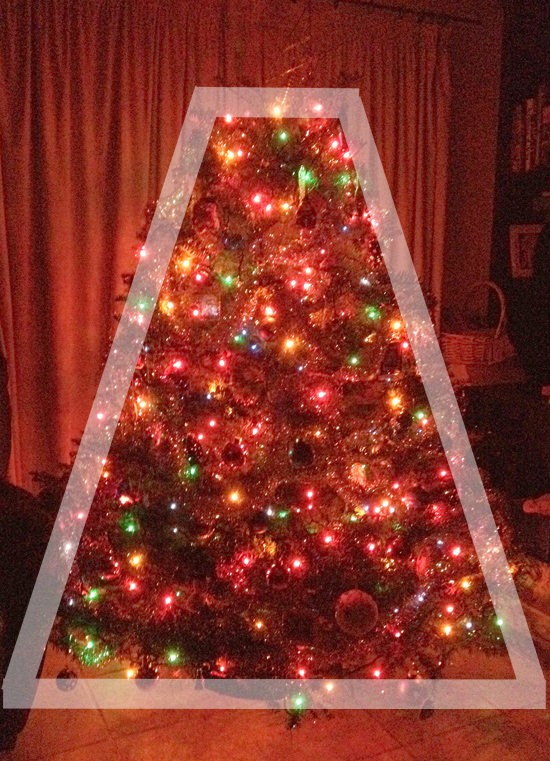
    Related articles
  • Rectangles and Triangles – How They Compare

    Rectangles and Triangles – How They Compare

    I have been working with eHow.com to get some common math questions answered. One of the questions was, “How are the areas of a rectangle and triangle with the same base and height related?”

    Curiously, all rectangles can be cut into triangles. And all triangles can be doubled to make a rectangle. Watch this video – and then get out the construction paper, scissors and glue.

    Grab a kid and have some fun watching them discover!

    Have thoughts on this? Share them in the comments. And don’t forget to share it on twitter/X.

    Related articles
  • Magna-Tiles – Must-Have Magnetic Shapes

    Magna-Tiles – Must-Have Magnetic Shapes

    Daughter got a set of Magna-Tiles geometric shapes from her aunt for Christmas. I distracted her long enough to get some great photos so I could write about this amazing toy.

    Magna-Tiles

    When teaching math, you pull out any shapes you can from anywhere in the house. And sometimes stuff you can buy trumps all the other stuff. Not often – the home holds tons of great geometric manipulatives – but sometimes.

    Magna-Tiles are better than anything in the house!

    The magna-tiles are clear, so they’re pretty and you can shine light through them.

    Also they’re magnetic – so they stick together and stick on the fridge. Great storage for fast usage!

    And then – here’s the best part – they’re geometric shapes! Two sizes of squares, three sizes and shapes of triangles.

    Magna-Tiles Closeup

    You’d think that being geometrical was the first requirement. But really – clear, pretty and magnetic go a long way!

    Get these fabulous shapes at Valtech! Co. on Amazon.com, or at your local teacher/homeschool supply store.

    Do you have some? Do you want some? Share your thoughts in the comments.

    Related articles
  • What is a Ruler and Compass Construction?

    What is a Ruler and Compass Construction?

    I’d never heard of this thing until grad school. And even then, I never asked what it was. Over the course of time I eventually figured it out, but never really got an opportunity to do much with it. Nor have I had a chance to teach it.

    A teacher interview question from Oleg Gleizer’s book inspired me to think about, and learn, this nifty skill.

    So what is it?

    Here’s the definition (mostly from Wikipedia):

    A ruler-and-compass construction is the construction of lengths, angles, and geometric figures using only a ruler and compass.

    This means that you can take one of those “pointer and pencil circle making things” and anything really straight (the side of your new iPhone, the edge of a file folder, etc.) and make pretty much create anything in geometry.

    Pretty cool, huh?

    I gave it a shot!

    I used Oleg’s teacher interview question:

    Given a straight line and a point away from it, how would you draw another straight line passing through the point and perpendicular to the original line, using a compass and straightedge as tools?

    Can I do it? Of course!

    Well… I thought about it and it seemed like I could. So I went out and got a compass, and used a fingernail file as a straight edge. Here’s how I did it:

    Here’s the line and the point. Easy peasy.

    I made an arc from the point through the line, so I would have two spots on the line (where the circle piece went through):

    From those two places, I made two more arcs through the point above and long enough to run into each other below:

    I connected the point with the intersection of the arcs at the bottom and VOILA: perpendicular line to the other line!

    Join me in the journey!

    This is the first in my ruler and compass journey. They’re kind of fun, and I want to do more. So I will house them here, for future reference.

    Here are the first 10 on my list.

    1. Line perpendicular to given line through given point not on given line. (this one)
    2. Perpendicular bisector of given segment.
    3. Right angle at given point on given line.
    4. Square with given segment as side.
    5. Equilateral triangle with given segment as side.
    6. Hexagon with given segment as side.
    7. Copy a given angle to a given segment.
    8. Line parallel to given line through point not on given line.
    9. Dividing given segment into N equal parts.
    10. Bisecting a given angle.

    Grab a straightedge and compass for each member of your family and join me – let me know you’re on board in the comments or via email.

    Related articles
  • Teaching Geometry with Pickles

    Teaching Geometry with Pickles

    Daughter is into pickles. Like way into pickles. If I were to start a blog just for her, it would be called www.PicklesAndPretzels.com. (She’s also into pretzels.)

    So when Husband grabbed two instead of one jar yesterday, it seemed natural.

    Unloading the groceries, I saw the two jars a little more closely.

    “Holy cow,” thought I. They’ve made ellipses (pickle ovals) out of segmenting cylinders (the whole pickles)! And they’re marketing them!

    Math in action – via Vlasic!

    Interested in more about ellipses? Check out Wolfram MathWorld’s bit on it.

    Related articles
  • Cuisenaire Rods Go Pythagorean!

    Cuisenaire Rods Go Pythagorean!

    I’ve been playing with the lovely Cuisenaire Rods for a few weeks now. I made the (fortunate) mistake of creating this flower in a past article about coordinate pairs.

    The mistake was that I would eventually have to come up with the coordinates for this thing. Fortunate because it gives the MathFourTicians out there something else to teach with the rods!

    The center of the flower is the place to start.

    Since all the “petals” are attached to the center, that’s probably the best place to begin.

    I converted to something I could see.

    Since everything is tiny (1 cm), I went to a bigger setup. And some of the coordinates were easy to pick out. So I put those in the big grid, too:

    And then I started to do some work…

    Next I considered what I was really dealing with: a square. And each side was 1 cm.

    According to those crazy Pythagoreans, the diagonal measures 2\sqrt2:

    So half the diagonal is 22\frac{\sqrt{2}}{2}:

    I went back to the big grid.

    When I put this information on the big grid, it looks like this:

    Doing some arithmetic and geometry, I get:

    Using my very cool TI-30 calculator, I get that 22120.2\frac{\sqrt{2}}{2}-\frac{1}{2}\simeq0.2.

    I can accurately name the points!

    Knowing that each corner pokes out roughly 0.2, I can calculate the coordinates:

    From this I can create the ordered quadruples as described here for the petals of the flower. But at this point I’m pretty much needing a break. So I’ll leave that for next time.

    Whatcha think? Fun? Share your thoughts in the comments and on Twitter:

    Related articles
  • How to Teach Right Triangles when Crossing the Street

    How to Teach Right Triangles when Crossing the Street

    This morning Daughter and I went to the gym.

    When we crossed the street, I exposed her to undo risk by crossing at an angle.

    So on our way out, I explained to her that we were walking a little further to get to the car this time. And we would minimize the risk of getting hit by a car by taking the longer route.

    (Of course she’s not yet two, so she really didn’t care. But it was important for me to say.)

    Crossing at an angle is shorter than going straight across.

    People most often cross the street at an angle. Intuitively we know it’s shorter. Look at the tiny person in this picture. He needs to get to the front door of the store.

    It’s five yards to go at the angle, while if the little guy walked straight across then up, it would be seven yards.

    Suppose walking one yard takes 5 seconds. It will take the little guy 15 seconds to cross the street straight across. (And with a toddler, it does take 5 seconds to walk a yard.)

    Then he has to walk the four yards along the side to the door. Which means his total time is

    3 yards across at 5 seconds per yard = 15 seconds

    4 yards up at 5 seconds per yard = 20 seconds

    Total walking time = 35 seconds

    If he went at an angle, it’s 5 yards total (by the Pythagorean Theorem).

    5 yards diagonally at 5 seconds per yard = 25 seconds

    Total walking time = 25 seconds!

    Crossing at an angle puts you at risk for longer.

    For the pedestrian in a hurry (and wearing the shirt that reads “Safety Third”) the angled route is the way to go. But for a parent with toddler in tow, minimizing risk is a better option.

    If the little guy were to cross at the angle, he’d be in front of the oncoming cars for 25 seconds. If he were to take the route that is longer overall, he’d be in front of oncoming traffic for only 15 seconds.

    The car doesn’t care what angle you’re walking, it can squish you pretty easily either way.

    Not to mention he keeps the driver happy.

    Getting out of the driving area faster means keeping the driver happy. That might not be your goal, but adding some cosmic happy juice into the world of drivers never hurts.

    Plus, if someone were to “hypotenuse you” by taking the angled route when you were driving, wouldn’t you get a little annoyed?

    Next time you practice safety, practice math!

    So be safe. And tell your children why.

    It’s all about the math!

    Share your thoughts in the comments.

    Related articles

  • Perimeter and Area of Mommy’s Necklace

    Perimeter and Area of Mommy’s Necklace

    Written as part of the Count 10, Read 10 series.

    I noticed Daughter attempting to bejewel Husband with a strand of my faux pearls the other day. I watched, enthralled with the math learning taking place.

    She held the necklace in her hands – one on each side. Just about equal. So the space available for Husband’s head was almost non-existent. Like this:

    If she were to hold the necklace at two points that were closer together, she would create a “dip” in the necklace where his head could fit. Like this:

    There’s an extended learning opportunity here!

    This made me think of all the nifty things you can show about the relationship of perimeter to area and how you can have the same perimeter but change the area to all sorts of sizes.

    If you aren’t wearing a necklace, find some mardi-gras beads. Daughter has many strands, so I’m guessing your house might be littered with them as well. If not, join the club. Go buy some.

    Play with them in the bathtub or right before bed. (Make sure they give them up before going to sleep, though – it’s a strangulation hazard!)

    Move the necklace around on a flat surface (or on the bed) and let your child experiment with the ways the area changes. Ask questions like:

    • How much “stuff” can you fit inside the shape? (If there are blocks or other toys to act as “stuff,” use them.)
    • How much “stuff” can you fit inside the shape after you move it around?
    • Is that more or less “stuff” than you could fit inside it before?
    • Did the distance around the necklace change? (You can introduce the words perimeter and circumference.)
    • Can you make it into a square? A triangle?

    Be careful how much you do.

    Don’t forget, activities like this should be fun. For your child as well as you. So don’t get too in depth talking the math talk if it feels weird. Go with the flow.

    And let me know how that flow goes, would you? Share your thoughts in the comments.

    Related articles