Tag: toys

  • Graphing with the Lite-Brite

    Graphing with the Lite-Brite

    It’s not just for playtime anymore!

    Drag out the old one, pick up a used Lite-Brite or grab a brand new Hasbro Lite-Brite.

    Or… click to get the online Lite-Brite simulator (the technology these days!). And get ready — because that old classic is about to become your child’s favorite graphing lesson!

    1. Draw a picture on a Lite-Brite template.

    Download the Lite-Brite Classic Template if you have the classic toy. If you’re using the new one or the simulator, get the Lite-Brite Square Template.

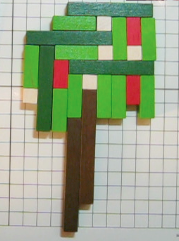
    Draw a picture on it in pencil. Here’s mine:

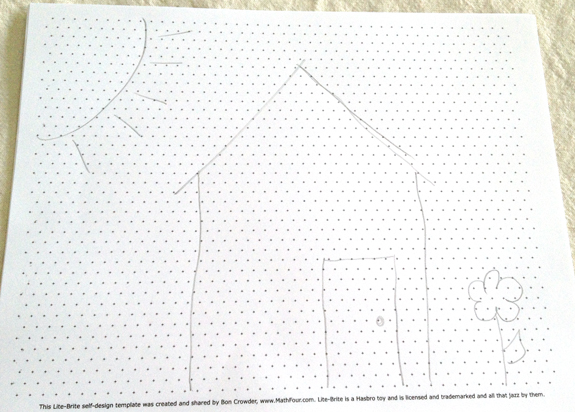
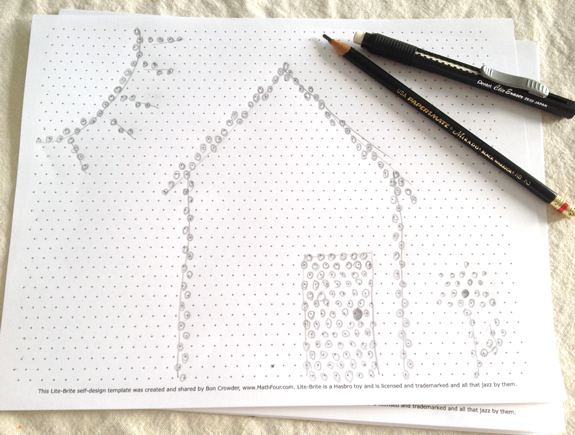
    2. Determine the best peg placement.

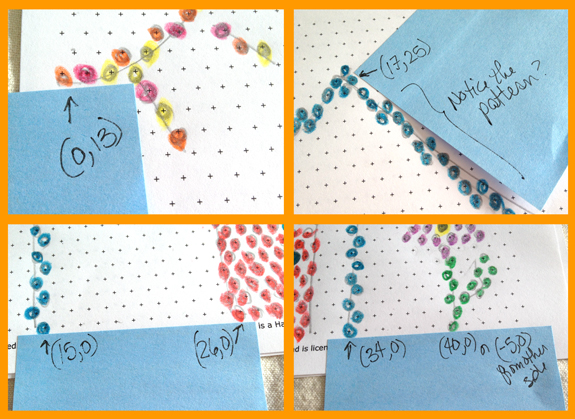
    Rough sketches don’t quite work with the peg placement. So draw the peg holes on the template as close to your lines as possible. Start noticing patterns.

    3. Use colors!

    Pick some good colors you’ll want to use when you’re graphing your picture. Unless you and your kids know the exact number of Lite-Brite pegs you have, in which colors, you’ll probably have to tweak this in the next few steps.

    4. Figure out where to start

    Here’s where things get very interesting. The peg holes are NOT lined up in what you would call a Cartesian coordinate plane. They’re not really in any kind of coordinate plane system. At least not that I know of.

    The crazy structure in the grid doesn’t really matter. The fact that you can still count over and up to get where you want to go is what matters.

    You and your children get to devise the way you count over and up.

    5. Count and push!

    Your child can follow the pattern on the template and push the pegs in the Lite-Brite. This offers practice for the skills they’ll use when graphing and working with the slope of a line. This is the precursor of calculus!

    Notice that when I was graphing my drawing, I had to change the door from solid to hollow. I ran out of pegs. #ARG

    Try it!

    Find your Lite-Brite and download the template: classic or square. Post a link to your finished work in the comments and tell me how it went!

    Share your thoughts in the comments or on twitter/x.

    You might also like:
  • Melissa & Doug’s Animal Pattern Blocks Set

    Melissa & Doug’s Animal Pattern Blocks Set

    What did the hexagon say to the trapezoid?
    “I’m twice the shape you’ll ever be!”

    Corny – right?

    I made that joke up while playing with Melissa & Doug’s Animal Pattern Blocks.

    It has ten different animals (on five two-sided boards) and over 50 plastic shapes in tons of colors to complete the pictures.

    Use it to teach more than just shapes.

    Of course you can talk to your toddler about hexagons, triangles, parallelograms (which are also rhombuses in this math toy) and trapezoids. But you can do even more!

    All the shapes can make the bigger ones. So it’s not just a bunch of shapes that may or may not work – this toy is designed with some serious thought.

    Here are some questions you can ask while playing:

    How many of each shape can squeeze into a hexagon?

    Pick a shape and cram them into the hexagons!

    How many triangles fit in each shape?

    This is huge in math. Since all shapes can be made of triangles, answering this questions preps your little one for some big geometry stuff.

    And after you play with those a while, you might notice how the number of sides of a shape compare to the number of smaller shapes that can fit in it.

    Get a set of Animal Pattern Blocks and have fun!

    Share your thoughts in the comments or on twitter/x.

    You might also like:
  • Rush Hour Traffic Jam Game

    Rush Hour Traffic Jam Game

    Some amazing math found in the @ThinkFun game of Rush Hour! MathFour.com

    My sister-in-law showed me the Rush Hour Traffic Jam Game by Think Fun this weekend. She “assigned” one of the harder cards in the deck to me (sometimes it sucks to be known as the math mom) and assured me that I could do it.

    The Set-up

    You set up the 6×6 game board with the plastic vehicles just like the game card shows. Here’s where the math starts.

    The skills children develop doing this support graphing on the Cartesian coordinate plane later on.

    Even if your child isn’t ready for the actual game play, this step supports them in math!

    The Goal

    Allow the ice cream truck to “escape” the maze.

    In order to do this, you are allowed to slide any of the cars forward or back. They can’t crash into other cars to push them out of the way. And you can’t lift any of them off the game board.

    A more challenging goal is to also do this in the minimum amount of moves possible.

    The Strategy

    Everyone has their own plan. My nephew likes to scooch the cars around until he stumbles upon an answer. I decided to pick up the cars and move them to the most unique solution to see what the end result should look like.

    The Math

    You’ve the coordinate plane. You have logic. And you have strategy. But you have someone much more amazing here.

    The beauty of the game is the way it simulates mathematical research and discovery.

    • Everyone has their own style.
    • Everyone has their own solution.
    • If you follow the rules and “win” then you’ve done it right, regardless of how someone else did it.
    • There are many levels of success – and the player determines which level he or she is shooting for.
    • Given the board and the colorful cars, you can create your own game.

    Wanna play?

    The next time you’re tutoring or teaching math, consider treating it like the Rush Hour game. Give it to your child then back off. Refrain from telling or showing. Let him or her play.

    You’ll be amazed at what you see.

    Let us know in the comments and don’t forget to tweet this out.

    Related Articles
  • Cuisenaire Rods

    Cuisenaire Rods

    Cuisenaire Rods are brightly colored wooden sticks. Technically, they’re “proportionally sized rectangular parallelepipeds.” (But only say that if you want to hear your 3 year old repeat something really cute!)

    The “proportional” thing is important. The white ones are 1cm square, the red ones are twice as long and each color is 1cm more than the next color.

    I’m anticipating many articles and videos on how to teach with these (since  the possibilities with these things are virtually unlimited), so I thought I would start a running series. Here are the ideas and the links to the articles/videos that are ready:

    Creating Coordinate Pairs with Pictures

    Share your own ideas on how to use Cuisenaire Rods in the comments!

    P.S. I spent my hard earned money on these at Teacher Heaven. This small set was $15 in the store, but I see you can get it for less than $13 online

    This is also shared on Works for Me Wednesday.

    Related articles
  • Union, Intersection and the Empty Set

    Union, Intersection and the Empty Set

    The union is on the left and the intersection is on the right.

    I discussed empty sets in a previous article. I hadn’t yet listened to the recent podcast of The Math Dude, Jason Marshall, in which he introduced sets and subsets. Such a curious coincidence; I thought I would continue down our united path.

    This week, the sweet Math Dude talked about union and intersection of sets. So I’m heading there too – and incorporating the empty set.

    Union and intersection have symbols.

    These symbols represent “operations” (like addition or multiplication) that you do to a pair of sets. They are called the cup and cap and look like, well, a cup and a cap. Or a U and an upside down U. The Union is the U and the intersection is the other one – that’s how I remember it and teach it.

    For the sake of illustration, I’ll use Daughter’s handy SnackTraps like in the picture above.

    The union is everything.

    The sets I’m using are

    L ={green cube, blue half circle thingie}

    R = {green cube, red triangular prism, orange rectangular prism}

    I’m using the letters L and R for left and right in the picture.

    The union of the two sets results in all the pieces from each set, all crammed together. (And if there is a repeated item, you only take it once.)

    The union of the two sets is everything combined (without duplicates).

    Let’s take the set of all states that border Texas and the set of all states that border Oklahoma, like this:

    T = {Louisiana, Arkansas, Oklahoma, New Mexico}

    O = {Arkansas, Colorado, Kansas, Missouri, New Mexico, Texas}

    Then the union of the two would be “The set of all states that border both Texas or Oklahoma or both” and would be T U O = {Louisiana, Arkansas, Oklahoma, New Mexico, Colorado, Kansas, Missouri, Texas}

    Notice we don’t keep duplicates.

    The intersection is only the common stuff.

    Using the same L and R sets from above, I can take the intersection.

    The intersection is only the stuff they have in common (we get rid of the duplicates here, too).

    Let’s go back to our set of all states that border Texas and Oklahoma:

    T = {Louisiana, Arkansas, Oklahoma, New Mexico}

    O = {Arkansas, Colorado, Kansas, Missouri, New Mexico, Texas}

    Then the intersection of the two would be “The set of all states that border both Texas and Oklahoma, at the same time” and would be T ∩ O = {Arkansas, New Mexico}.

    What happens with the empty set?

    When you start throwing the empty set into the mix, you follow the same rules.

    For the union, you throw everything in both sets into one bag. Well, since there’s nothing in the empty set, “everything” is the original other set!

    The union of the empty set with anything… is that same set back!

    For the intersection, you take only the stuff that’s in common between the two. Since the empty set has nothing – there’s nothing in common.

    The intersection of the empty set with any other set it just the empty set – there’s nothing in common at all!

    Think about it…

    Does this remind you of anything? What similarities do you see between this and addition or multiplication (or subtraction or division)? Ask your children these questions too.

    Get out some snack traps and blocks (or a map) and go for it! Let me know how it goes in the comments.

    Related articles
  • Teaching Subtraction Using a Balance

    Teaching Subtraction Using a Balance

    I love finding nifty ways to use tools for teaching math. Especially tools that aren’t supposed to teach math. Or at least the math I’m trying to get it to teach.

    I have this very cool balance that I got from Discovery Toys that would normally be a science toy. But, alas, I’m a mathematician, Jim, not a doctor. So I’ve taken the fancy science toy and turned it into a way to teach subtraction.

    You can, of course, use it to teach addition and later I’ll do a post on using it to teach multiplication and division.

    If you have children who struggle with math concepts, teaching them with hands on bits (manipulatives) sometimes helps. Here’s how to teach subtraction using a balance:

    This nifty trick can be done with any balance as long as you have weights appropriately sized. Sometimes that’s not so easy to find. Order a colorful balance that’s similar to the Discovery Toys one in video here.

    Did it work? How did your children receive this method of learning arithmetic? Please share your experience with it in the comments!

  • Counting with Ordinal Numbers

    Counting with Ordinal Numbers

    In the last post I discussed cardinal and ordinal numbers. I gave definitions but not much in the way of examples.

    Here’s an example of using ordinal numbers to count up to arrive at the final cardinal number. Oh – and I’m using the fun little critters from Discovery Toys!

    Whatcha think? Does it make you want to count some bugs?

    What other ways can you use to teach counting?

  • How to Train the Brain to Understand the Transitive Property

    How to Train the Brain to Understand the Transitive Property

    Remember the ol’ “if A equals B and B equals C, then A equals C” deal? At parties it’s a great line to drop. In math, it’s officially called … cue music…

    The Transitive Property

    Saying it is fun, teaching it is curious, learning it can be weird.

    Grownups think it’s intuitive. But to a kid, it isn’t. It takes experience and experimentation to learn all the bits that we think are “common sense.”

    The transitive property is really thinking things through. Starting from one place and moving along through another and then arriving at a third place.

    There are many ways to help kids with this learning. Word problems simulate thinking stepping stones. But they can be rather stressful. If you do it through play, you reduce the stress that they face and give them skills they need to tackle advanced thinking, forever.

    This video shows a nifty “toy” from Discovery Toys that can get kiddos using those brain stepping stones.

    Notice the flow is

    1. Choose the number tile with the question number.
    2. Read and answer the question.
    3. Correspond the answer to the letter in the answer box.
    4. Put the number tile with the question number in the corresponding letter box.

    Thinking through from question number to answer letter while avoiding the pitfalls is the challenge.

    Have you played with these? How do you train your kids’ brains for the transitive property?

  • How to Teach Division in the Sandbox

    How to Teach Division in the Sandbox

    Need to offer a better way to understand the concept of division and remainders? Try it in the sandbox!

    The Discovery Toys  are proportional, so they allow a really engaging way to see how division and remainders work.

    This video shows how you can help kids put together the numbers 9, 4 and 1 to “see” division at work:

    You can also do this in the bathtub or pool. And the are perfectly weighted and “massed” so they float.

    I think this has something to do with “water displacement,” but I’m not sure. I’m a mathematician, not a physicist. 🙂

  • Using Toys as Curriculum Tools to Teach Arithmetic

    Using Toys as Curriculum Tools to Teach Arithmetic

    Want to give your kiddos a jump start on multiplication and division? What to help the ones struggling with division to grasp it better?

    The Discovery Toys Measure Up Cups can do just that. They are built as a curriculum tool, in the proper ratios, so that the #6 cup holds exactly twice as much as the #3 cup. This allows for engaging and beneficial play that gives kids a grasp on how numbers relate to reality.

    For example, in this video, kids can compare the numbers 3, 6 and 9 to see how they relate:

    You don’t have to say out loud, “three plus 6 is 9” or, “9 divided by 6 is one with three left over.” But these concepts are ingrained into the child’s brain as they see this work.

    What do you think?